FilmCutter was created to serve as a platform for writing AviSynth scripts. I found myself using three or four tools to edit the content of a script, jumping between programs to collect data, so I wrote this tool to act as a launch point for creating my AviSynth scripts and collect the frame numbers to define my cuts. That was two years ago, and lots of things have changed.
New -
This guide applies to versions 1.8 though 2.0 beta. Changes made to the
editor for version 2.0b are minor and relate to the use of the source /
project radio buttons, these changes are not reflected in this document.
Please view the change log for additional information.
Instead of
updating and correcting the information contained in this document a new use
guide is being written because changes to FilmCutters editor will render
the information here mostly useless.
See Multiple Source Editing.
Script Editor, click for a guide to the Scirpt Editor
Video Editor, your here.
In order to use AviSynth or avsFilmCutter you need a script. The proceeding sentence could easily be the first sentence of the first paragraph of all the guides I might write for FilmCutter. In this instance where we wish to use FilmCutter's video editor we will need a "source script". The "source script" will need to be one long video.
1 v1 = AviSource("your file.avi")
2 v2 = AviSource("your second file.avi")
3
4 v1 + v2
The script above is, of course, very simple. The script needs to be saved or unmodified, never the less FilmCutter will use the script file on your hard drive not the one in the script editor window. You may jump over and edit your "source script" at anytime, just save the changes you make and FilmCutter will reload the "source script" into the video player (if you change the number of frames the "source script" produces then any scenes you have already selected could be inaccurate).
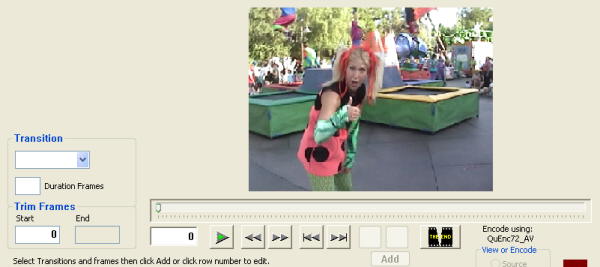
The script is loaded and the first frame "0" should be showing in the view window. The frame counter is next to the play button. Click the play button and let a few frames go by then click the play button again to stop. The two buttons just to the right of the play button are frame forward and frame reverse (you may alternately use the left and right arrow keys (holding the right arrow down will almost play the video on quicker systems, reverse is much slower). The two buttons again to the right are the jump forward and reverse buttons, each time a jump button is clicked the video will jump 300 frames in the direction selected (the number of frames jump buttons jump can be changed, edit filmcutter.ini). Continuing to the right pass the two dead buttons is the cut button or the start/end toggle button.
Ok let us navigate to the first frame of the scene you wish to select, let's say frame 300, click the cut button then move on to frame 900 and click the cut button.

The cut button becomes disabled and the "Add" button becomes enabled. I hope you have noticed that the trim frame start and end text boxes have grayed out, the gray out is provided as a guide to what is next in the process, that being sending frame numbers down to the scene list show below in the next picture.
This steps are:
Simple. When you click "Add" to the scene list, total frames and total time should be showing the scene you just selected as your first row (you should understand without me explaining that 900 minus 300 equals 600 except that all frames shown are part of your scene so add one for the first one). You may right click the scene list window to bring up the write script dialog box or you can right click on a row number button to delete that row or insert a new row above or below.
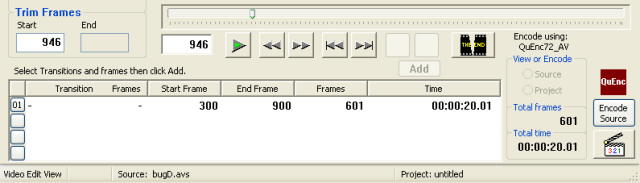
You may also click the row number button to edit that row. You'll notice
that the first column of the scene list labeled "Transition Frames" shows "-
-" which are place markers noting that nothing
is there no transition and no transition frames or no start/end frames when
following a transition like dissolve that includes frames from the scene
before and scene following. This should make sense looking at the
following snapshot showing the transition selection list box and the transition
duration box.
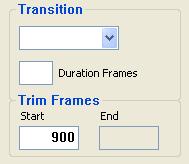 Click the little down arrow and select a transition from the list.
When a transition is selected a default transition duration shown in frames
will appear. Click in the box and change to your desired value.
It is most important to understand that until you click the "Add" button
anything can be changed, the transition / effect or start / end frames,
just click on it and change it.
Click the little down arrow and select a transition from the list.
When a transition is selected a default transition duration shown in frames
will appear. Click in the box and change to your desired value.
It is most important to understand that until you click the "Add" button
anything can be changed, the transition / effect or start / end frames,
just click on it and change it.
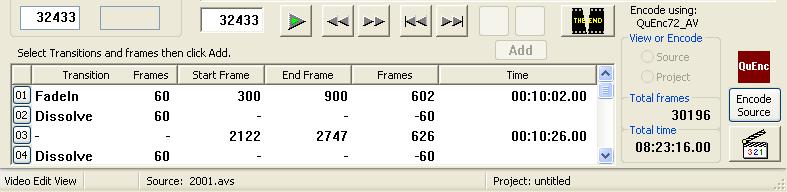
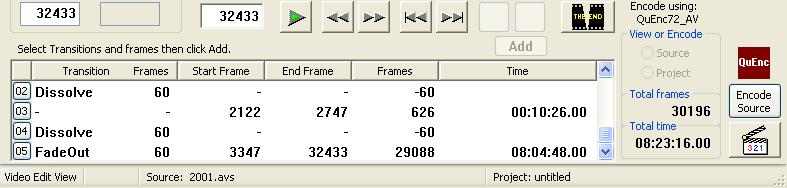
Before we get much farther along let me speak about transitions and
effects. FadeIn, FadeOut and FadeIO are effects. Dissolve is a
transition. The fade effects act on the beginning and or the end of a
scene and dissolve acts on the ending frames of the proceeding scene and the
beginning frames to the next scene. You can see the difference displayed
in the pictures below. Because a dissolve overlaps the two scenes the
result is shorter by the overlap or 60 frames in the example below.
Fades have an effect on frame count as well, the versions of fade FilmCutter
supports adds a total black frame to the end or beginning of the scene they
are applied to (FadeIO adds one to each end).
Editing with FilmCutter is easy although not automatic, the data for any action is stored in it's window, clicking "Add", "Save edited row", or "Insert row" send the data from the windows to the list.
Now let us back up a little and get simpler. Looking to the lower right corner of the main window you see an encode button, the Icon for the default encoder (if you have one set up) and a box labeled View / Encode with two radio buttons in it. The source / project radio buttons are by default disabled and are activated when you save or open a project. The user will need to create (save) a project to enable this portion of the program. When we have a project name to work with FilmCutter will generate an output script that follows the data in the scene list. Although you can have a scene list full of many scenes and transitions you can't view or encode your work until you are working in a project. Don't be fooled into thinking that FilmCutter will continue to save your project as you work along, you must save the project to save your data. FilmCutter needs a project to have a file name for the output script that will be generated each time you select project from the source / project radio buttons.
With the project radio button selected the viewer switches to the project script. You may change the view to "script editor window" to see the the text of the output script (current versions of Filmcutter allow you to save the edit and then save the project file just remember that switching between source and project views will erase your saved project output file unless you change the name) or select the preview window to see a larger version to the video. You may also click the external viewer button which will launch the external viewer with the source or project script depending on the state of the radio buttons. And of course you may encode the source or project script using the encode button.
c:\video projects\myproject.jfc
c:\video projects\myproject_fcprj.avs
### Project Script Created by FilmCutter ###
##############################################
Import("c:\video projects\your source script.avs")
t01 = trim(1393,2099)
t02 = trim(2131,3340)
t03 = trim(4542,6056)
t01++t02++t03
### Project Script Created by FilmCutter ###
##############################################
Import("c:\video projects\your source script.avs
t01 = FadeIn(trim(21727,29587),60)
t02 = Dissolve(trim(29588,29688),trim(29865,29965),90)
t03 = trim(29966,37089)
t04 = Dissolve(trim(37090,37190),trim(37191,37291),90)
t05 = FadeOut(trim(37292,42934),90)
t01++t02++t03++t04++t05
Not much more I can say except enjoy and thanks for looking the project over. Of course if you would like to report a bug or add your opinion on how FilmCutter should work, please contact me. There is much more to do to.
Good luck and thank you for your interest in FilmCutter. Feel free
to contact me.

or
avsFilmCutter thread
in the AviSynth usage forum at Doom9.org